Drawing methods
These are some drawing methods or rather processes are came across that some renowned CG artists use. Most are a combination of using 3d and drawing so you get the best of both worlds.
Drawing cars and technical objects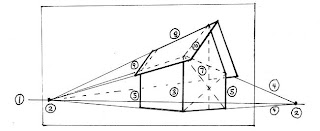
This is a purely drawing method. on paper and penceil. Its particularly good for cars, buildings and mechanical objects rather than bio objects. you must have a good understanding of point perspective for this.
Drawing cars and technical objects

This is a purely drawing method. on paper and penceil. Its particularly good for cars, buildings and mechanical objects rather than bio objects. you must have a good understanding of point perspective for this.
- Establish plane on 1,2,3 point perspective
- Draw wheel base on close side
- Draw wheel base on further side using the b4 side as a reference
- Join wheels and make cylinder
- Find the centre point of the car
Draw the side silhuette of the car along the centre point
Drawing overlay method
This method is good for those who are used to doing their artwork on paper. The bad part is the lighting could go wrong if you arent good at lighting. However the out come of this kind of drawing is more authentic and home grown.
- Draw the the whole picture on paper with detail and lighting. draw with precise lines.
- Scan your pic and open it up on photoshop
- Set your image to overlay. create new layers below and above.
- Color the base colors below in a water-color like way.
- Add detail on another layer. still below the main overlay
- Keep adding details with layers using this bottom up approach
- In the layer above the main overlay add atmospheric effects like light,smoke.
Drawing with reference lighting method
- Draw pencil scetch in line art
- Do seperate detailed character scetches of each character and object
- Do a 3D scene with rough shapes and lighting. this is to get the lighting right
- Now that you got the light right start coloring the line art. but do this in seperate layers
- Do shadows and fog in seperate layers
- Spend extra time to add detail
- Adjust colors and fine tune.
Carving out model method
In this method a basic model of the object is created on a 3D modeling program and the rendered image is used at a starting point to work on. This method is especially good for mechanical objects and buildings
- Make a rough 3d model of the object you are working on using basic shapes
- Render with lighting. output an image
- Put the image into photoshop and shape it up.
- Add detail in the shape
- Add colors and shading of the object
- Add paint faded and wear and tear
Labels: 3D, digital art, drawing
posted by razor at
12:02 AM
0 Comments
![]()